
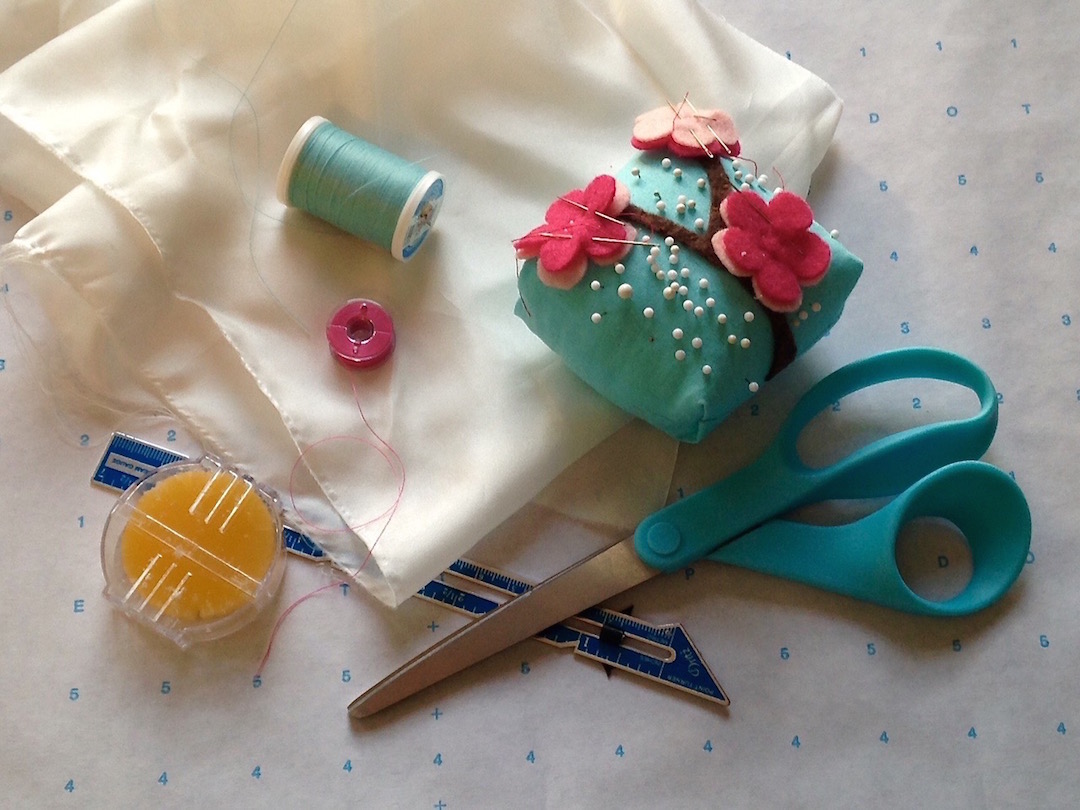
Essential Sewing Supplies
What sewing tool should you buy to start out? Which tools are necessities, luxuries, and a waste of money? What I must have to sew.
Which Sewing Supplies Should I Buy?
It's very easy to get overwhelmed with all the options for sewing tools and machinery out there. What do you really need? What are the essentials and the cool extras, and how do you know what to look for when you buy?
Absolute Essentials
Sewing scissors - even relatively inexpensive brands, like Fiskars, perform well. They need to stay just for sewing. Designate a box, tote, or drawer for your sewing supplies. Sewing scissors need to stay very sharp, and so you don't want to use them to cut other materials. They can go through lightweight papers used in sewing without a problem, but cutting heavier papers, and anything craft related is a bad idea. They'll cut through it much better than your desk or craft scissors, but they'll also get dull edges that will then start fraying your fabric. If your scissors get dull, most stores have sharpening services, or you can buy a sharpening stone. I have a pair of scissors I have used since I was eight years old and they still work. Get a pair of 8" shears for cutting patterns, and a pair of small, sharp tip detail scissors.
Cardboard cutting board - These come in more than one size, although getting one to fit your table is prudent. Or you can just kneel on your floor with a back brace and some nice knee pads left over from your days at the roll-o-rink.
Hand sewing needles - a pack with a few sizes is ideal for different weights of thread and fabric.
Beeswax or other thread conditioner - I never used this when I learned to sew as a girl, and I don't know how. It saves infinite headaches because it helps stop the thread from winding around itself when hand sewing, creating knots and tangles that then have to be cut only to begin again. It also strengthens the thread.
Marking pencils or pens - the simple chalk pencils will do, just be sure you have a GOOD quality sharpener. Even the small silver hand sharpeners will do fine as long as the blade is very sharp - get one in the art supply store or in the drafting section of your local office store. Don't bother with cheapo sharpeners. Like a colored pencil, the center of the chalk pencil tends to fall out if not sharpened correctly. The pens are usually air or water soluble, meaning they will fade away in 24 hours, or can be removed with a damp cloth. Remove pen and pencil marks before pressing with an iron, since heat can make them hard to get out.
Seam gauge ruler - indispensable for marking seams, evenly ironing hems, and such.
A good steam iron - Most companies will tout lightweight as a good thing. It's actually not. It's certainly easier to use, but the weight helps press the fabric flat. Why did you think it was called pressing? Higher wattage at least should mean greater steam capacity, though not always. Read the reviews. More steam equals better pressing.
Tailor's ham and seam roll - another couple of items I did not learn to sew with, and yet I can't imagine how. Actually, I can. I managed without it by accidentally pressing wrinkles into every curved seam I sewed. You don't want to do that. Get a tailor's ham. You will love it and start using it when doing your regular ironing work. It's indispensable. Use it for adding curve to a sleeve cap before setting in a sleeve, pressing curved darts at a waistline, pressing a curved seam at the hipline, adding shape to a collar . . . and more. A seam roll is only slightly less dispensable. Use it for pressing open seams on delicate fabrics that may leave an imprint, pressing cuffs, and getting into shirtsleeves and other tight areas without putting creases and dents in the rest of the garment.
Good quality ironing board - the cover is what's important. The frame can be chintzy if you like, although some of the fancy ones have a lot of bells and whistles. The cover should be 100% cotton. I prefer NOT to have any chemical scorch resistant treatment on it. Why? Because cotton takes more heat than any fabric, excepting linen. If I scorched my ironing cover, then what did I just do to my precious garment? What you want is a cover and pad that will trap steam and eventually let it evaporate. Steam is the key to reshaping fabric from something flat into something that fits your body. Look for a 100% cotton or wool thick pad and cover without chemical treatment. Avoid polyester foam for padding - again, it isn't absorbent. You can order heavy cotton ironing pads online or you can make your own ironing board if you want to get fancy.
Tape measure - No, the pattern sizes you see on sewing patterns are NOT the same as ready to wear. I wear a size twelve commercial pattern, my waist a little smaller, my hips a little bigger. I wear a size two in most major ready to wear brands. In general, adding ten to your ready to wear size is a good place to start, but again, that really depends on the brand of clothing. Why is this? The pattern sizes haven't changed in decades, but ready to wear sizes have. You need a quality tape measure that is accurately marked (check it with other rules - sometimes they are off) and does not stretch.
Seam ripper - Don't think you won't have to rip out seams. Just the way you were sure you would not rev the motor too much and crack the headlight on the rocks in the front yard when learning to drive, you may be sure you will sew carefully and not need to rip anything out. But you will. Yes, you will. Make it as easy as possible. Get several, since you will drop them on the floor inadvertently, or hide them from yourself in an unconscious effort to never again rip out another seam.
Point turner - Sometimes you can find seam gauge and point turners in one. Otherwise, I like the wood ones. They're inexpensive and the wood is good for giving a little extra heat to seams to help them stay open when pressing.
Pin cushion - More then one is handy, but you need at least one. Or a magnetic pin dish. Wrist ones are handy, except the ones sold in stores with a plastic band are intolerably scratchy to me. Which is why I have a handy tutorial on making your own . . .
Pins - Yes, I sew without pins a lot of the time. But you still need pins. Glass head pins are more expensive, but nice because they don't melt under an iron, in case I am pressing before stitching.
Machine needles - Match them to your fabric. Most of the time you will need a universal needle. Size 12 is great for many fabrics. 10 is good for sheers. 14 is good for heavier fabrics. If you plan to sew knits you will need jersey ball point needles as well. Since I use size 12 universal needles the most, I keep a pack on hand, in addition to several combo packs, and some specialty needles. You won't need as many needles as I do! They do wear out after a couple projects, so plan to replace them, and have alternate storage for your used needles (for some fabrics you will always want to start with a fresh needle to be safe). Schmetz is a good brand. The only caveat is they don't color code their needles, making it a bit annoying to figure out which kind of needle you have in your machine if you forget. Simple storage solution here.
Fantastique!
You may not HAVE to have these . . . but wait, yes you do. Once you use them, you will have to have them.
Pinking shears - Yet another item I didn't use when learning to sew. But I don't know how. If you want to wear a garment more than once, you'll want to wash it. At least, we hope so. Finishing seams is important, even though it isn't listed as a step in sewing patterns. How you finish the seam depends on the fabric and personal choice, but for a number of situations I like to simply pink the seams to prevent fraying. This also reduces seam imprints on the right side of the fabric when pressing.
Pattern weights - These are rather pricey. So instead I just bought a box of enormous metal bolts from the hardware store. There are also plenty of online tutorials for making your own. These save time when cutting out patterns to avoid pinning down every little edge (this works best on crisper fabrics that don't shift a lot, but with practice can be used on slinky little rascals). They're also handy as paper weights when you like to sew by an open window and you don't want to feel like a backup dancer in an 80's music video every time the wind blows your pattern pieces all over the room.
Rotary cutter and mat - Although I have enough practice to use fabric shears with pattern weights, I wouldn't recommend trying this to begin. Rotary cutters are kind of like a pizza cutter - a wheel that turns around to cut the fabric. They can make quick work of cutting out most any pattern, although they must be used with a self-healing mat. Don't even think about using them on a cardboard cutting mat.
Heavy duty clamps - Remember the sewing by the window scenario? Now imagine a lovely delicious breeze whisking your hair off your face, all sweaty from standing over a hot iron. It's so wonderful - until it picks up and lifts your entire cutting board off the table with the fabric you so carefully laid out. If you want to sew in a cubicle without windows, you probably don't need these, but I do.
Some sort of box for your patterns - I like the decorative paper boxes from stores like Michael's and Home Goods. Just consider the size and number of patterns to store before you purchase a box.
A binder and sheet protectors or other solution for drafting your own patterns, if you want to try this, or for altering patterns.
Tracing paper - You can get artist tracing paper in rolls of various sizes. I've also heard great things about the sewable cloth-like Swedish tracing paper online. I have a huge stash of Pellon Easy Pattern, which is also a sewable tracing cloth-like paper. I don't usually love Pellon products but this one is good. You'll want tracing paper for replicating patterns, altering patterns, and drafting patterns of your own. You'll be doing it before you know it! In a pinch you can use the plain newsprint paper that a lot of stores wrap breakables in for small size pattern pieces. I've used regular newspaper, but you can risk the ink bleeding onto your garments - don't do it with anything you can't toss in the wash!
Clapper, seam roll, seam stick, and ham holder - More pressing tools. Use the clapper to seal steam into a pressed seam on hard to press fabrics that like to spring back open (in a pinch, I use a wood ruler or other such item, and use my fingers to hold it down - careful, it's hot!). A seam stick is like a long wooden dowel that's handy for opening seams on delicate fabrics that can imprint. The ham holder props up your tailors ham to use the different curved edges more easily.
Tracing wheel and carbon paper - Makes quick work of tracing seamlines, darts, and other design details. Also handy for pattern drafting.

What is Grainline in Sewing? And Why Does it Matter?
What is grainline in sewing? Learn the difference between lengthwise grain and cross grain, what bias is, and why all of this matters to get great results in your garments.
Why Does Grainline Matter?
Want your finished garments to hang beautifully? Of course you do! Don't pick up your scissors yet . . . you need to first understand grainline, and know how to straighten it for beautiful results!

How to Find Grainline
And why does it matter?
Woven fabrics need to be straightened before cutting. Picture the threads forming a large grid pattern - some going lengthwise and some going widthwise. When fabric is cut, it is virtually never on grain, unless someone does so on purpose, or tears it along a single thread (more about how to straighten your fabric later.
That means when you bring home fabric, it is cut at a slight diagonal, whether you know it or not.
What Is Grainline?
First let's define grainline. Grainline is essentially the weave of the fabric: which direction the threads are running. It's important to understand because how you cut out a garment will change how the finished garment behaves. More on that in another post.
There are three grains: straight grain, cross grain, and true bias. Straight grain, or lengthwise grain, are the threads going parallel to the selvedge of the fabric - the uncut edges that are bound so that they do not unravel. When fabric is cut at a shop, it is cut on the crossgrain. The crossgrain are the threads running the width of the fabric - from one selvedge to the other. It is perpendicular to the straight grain. If you picture the straight grain being the longer threads that run in a straight line the entire length of the bolt of fabric and the crossgrain being the shorter threads that run across the width of the fabric, you'll remember the difference. *Note - if you get a small yardage cut which is less than the width of your fabric (say, one yard if your fabric is 54" wide), your lengthwise grain may actually be shorter than the cross grain! This does not matter. It is how the threads were woven that matters, not which is longer after a length of fabric is cut.
Straightening Warped Fabric
In a properly straightened piece of fabric, the straight grain and the cross grain should run at right angles to each other. However, sometimes fabric comes off the bolt warped from storage. If this happens, it is sometimes enough to pull on opposite diagonal corners until the fabric straightens itself. At times I've had very warped fabric that I had to get wet and reshape while damp. This can be tricky but luckily is usually not necessary.
Why is all this important? It affects how the garment will hang. To understand this, let's define bias. True bias is the 45 degree angle between the cross grain and the straight grain. To really get it, take any small square of fabric that is cut on grain. First pull on opposite edges. You'll normally see the cross grain edge straight just slightly (assuming this is a non-stretch woven), and the straight grain stretch not at all. This is why, for example, waistbands are cut on the straight grain, not the cross grain. You want them to be stable and not stretch out. This is also why pants are cut so that the straight grain runs vertically, not horizontally - because you want the fabric to have give and ease across the width of the pants rather than up and down. Now pull on opposite corners of the square. You'll see for some fabrics a medium stretch or shift in the fibers, and in some fabrics a dramatic shift in which the square no longer is a square. This is why bias cut dresses drape on the body in such a flattering way. It is also why they are harder to sew.
Now imagine a garment in which the pieces were cut not on the straight grain, not on the cross grain, and not on the true bias, but just slightly askew (slightly off grain). What would happen? The fabric would sag and pull slightly in the direction of the diagonal, making for an unflattering finished garment.
Therefore straightening the edge of grain is a very important, even if a bit tedious, task to do before cutting out pieces. Here's how to do it:
Assuming your fabric is not warped (if it is, pull on opposite corners to straighten it), take one small perpendicular snip into the selvedge near the cut end of the fabric - about two or three inches from the end, depending on how diagonally the fabric was cut (some shops cut it extremely straight, others, not so much). From your snip you should be able to gently fray the threads so that they come loose. Take a thread that runs right down the center of the snip - and gently pull with your fingers. As you pull it, the cross grain thread should pucker the fabric. Move these puckers very gently with your thumb and forefinger while keeping tension on the thread with your other hand. Don't try too much at once or it will break. Pull up at least several inches of gathers, or more if you can. Flatten out the gathers by pushing them forward so that it's more of a slight ripple in the fabric. Now cut along that ripple until you come to the end of the ripple (try not to cut the thread you just pulled - cut just to one side of it). Then pull it gently again and cut some more.
The purpose of pulling the thread is so that you can directly see one isolated crossgrain thread. This allows you to cut across the fabric using one thread as a guide so you wind up with a perfectly straight edge. Some fabrics have sturdy enough threads you can make it all the way to the opposite selvedge without the thread breaking, but this usually doesn't happen. If/when it breaks, simply take another thread as close as possible to the thread you were working with, and continue on.
Once finished, you will have a perfect edge. From here it's even more obvious if your fabric is straight. If you lay out your fabric and notice that the grainlines do not match the grid pattern on the cutting board (i.e. it's not perfectly square), again, gently pull opposite diagonal corners and smooth the fabric with your hands until it is on grain. If it can't be straightened, a blast of steam from an iron usually does the trick, and if even that doesn't work, at this point I will dampen it and reshape it and let it dry. An unfortunate detour, but much better than spending a lot of love on a garment and winding up with a crooked finished piece!
There: that wasn't so bad, was it? Now your garments will be cut perfectly straight and will hang beautifully. Hurrah!
Next step: cutting on the grainlines.
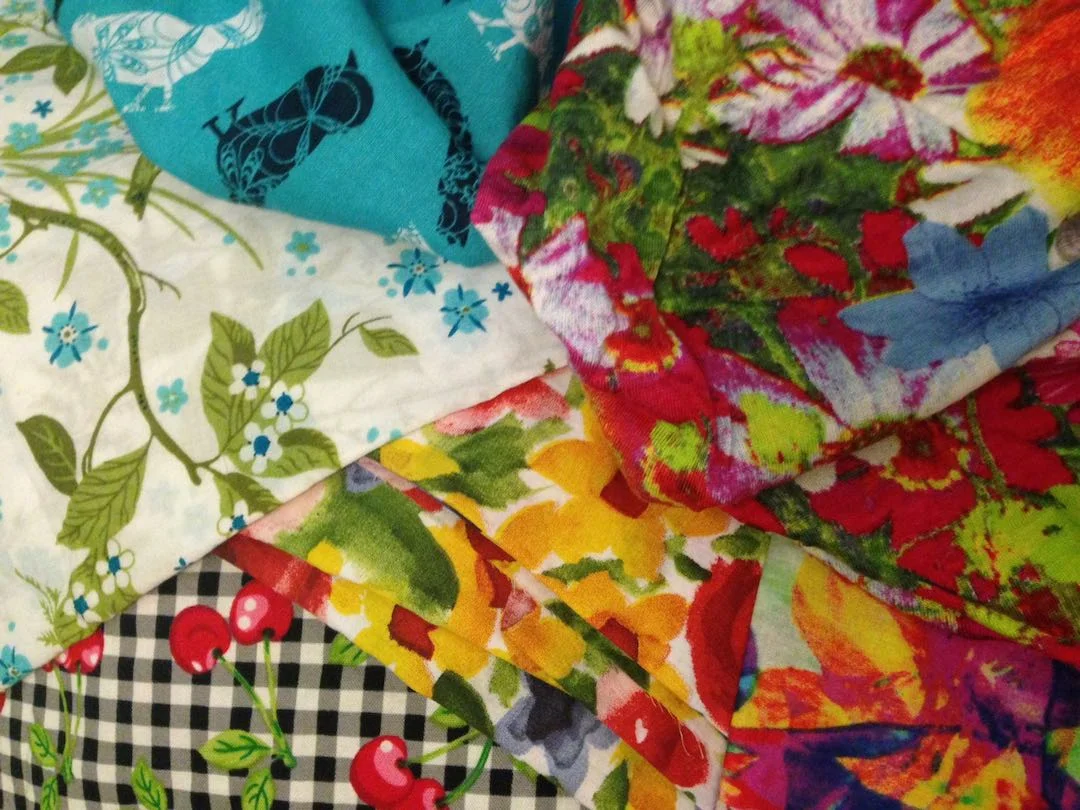
Fabric: A Crash Course
Learn about different types of fibers and fabric. Not sure what is the difference? This guide will tell you!
How do you go about choosing fabric?
You may show up at the fabric store be overwhelmed with options. Cotton? Polyester? Heavy? Light? What is sateen and what is satin? Which fabric goes with what pattern? Not knowing what to buy can sometimes lead you to wind up with disappointing results. Fortunately, a little know-how makes it much easier. Here is a intro-guide to tell you everything you didn't know you wanted to know about fabric!
Selection and general types
Pay attention to how much the fabric drapes when selecting a fabric for a garment. To check fabric drape, put your hand under the fabric near the middle and see how it falls off your hand. Drape is somewhat correlated to thickness, but not as much as you think. Some very light, sheer fabrics, like organza, have very little drape - they are crisp and will fall from the hands in thick folds. Some heavy knit fabrics still have a fair amount of drape.
More structured garments should have non-draping fabrics. These garments generally fit more precisely to the body. Draping fabric would mean sagging, which you don't want
Less-structured garments and looser garments need fabric with a little more drape. Some designs, like cowl necks, need fabric with substantial drape (soft jersey, for example).
FIBER is not the same thing as FABRIC. A fabric is defined by the way the cloth is constructed, and generally falls into two categories: knits, and wovens. A fiber is the raw material the fabric is constructed from. For example, knit jersey can be made from cotton, wool, silk, rayon, or polyester fibers, and each behaves, wears, and sews differently.
Knit fabrics will have rows of tiny v's, as the fabric is formed by wrapping loops of thread in much the same way as hand-knitting is done (except in this case it's done on a large machine, of course!). Knits can be found in a variety of fibers and weights. They may have subtle or substantial stretch. They tend to be comfortable to wear, and allow for a lot of ease on the body. Many knits are good for soft, draping designs, although some have more structure. Natural fiber knits (cotton, silk, and wool, and the semi-natural rayon) tend to be more breathable and comfortable to wear. Polyester knits, even if lightweight, are less comfortable (see fiber information below), and may stick to the skin in warm weather.
Woven fabrics are made by weaving the threads over each other in a variety of patterns. Most woven fabrics have a simple criss-crossing pattern to the threads: over one, under one. Some woven fabrics, like denim, have a diagonal pattern known as a twill weave (just look at a pair of jeans to see what I mean), and is constructed not by weaving on the diagonal, but by weaving over and under different numbers of threads. Fabrics may have a tighter or a looser weave.
Tightly woven fabrics tend to drape less and also fray less.
Loosely woven fabrics tend to have more drape (not always), and they have a certain design aesthetic because the threads tend to be larger and more visible, giving a textural look, but they fray badly and need special preparation and seam finishing.
Stretch woven fabrics have a bit of spandex woven in with the other fibers. Stretch woven fibers have hardly any drape, and you don't want them to drape. They are useful for pants, skirts, and form-fitting dresses. They are useful even if you don't want your clothes to be tight, but simply to fit, because not only do they provide comfort when wearing, they tend to keep the fabric "in shape", making it snap back to position, so there tends to be less sagging over time than with plain woven fabrics. Considering the design carefully when buying stretch fabrics. They are good choice for anything form fitting, but anything that is a little looser on the body should not be sewn in stretch fabric, or it will not drape properly.
Fibers are divided roughly into two categories: natural, and synthetic. I almost always prefer natural fibers, but each has some properties it is helpful to understand.
Natural fibers include cotton, linen, silk, wool, and *sort of* rayon and acetate. Cotton fiber comes from the cotton plant, and wool is the hair from sheep, as most people know; linen comes from the flax plant; silk is spun from silk worms; other animal fibers include cashmere from the cashmere goat, alpaca (from alpaca), angora (from a disturbingly long-haired rabbit), and camel hair, from . . . camels. These animal fibers tend to be mixed with wool or other fibers for stability and cost.
Rayon and acetate are semi-synthetic fabrics, made from
Natural fibers tend to absorb more moisture, making them comfortable to wear.
Natural fibers also need more steam when ironing and pressing and wrinkle more, again because they absorb more moisture.
Natural fibers tend to behave better when sewing than synthetics (perhaps some would disagree, but this is definitely my experience). I remember toiling for hours and hours when I was in high school sewing a simple bias cut skirt from polyester satin (which I will no longer buy under almost any circumstances). The fabric was very pretty, but was incredibly slippery and shifted constantly when cutting and sewing. By contrast, I sewed an entire wedding dress from silk charmeuse, which is a much lighter more delicate satin, and the silk charmeuse behaved much better than the polyester ever did. This isn't a hard fast rule, but better "behavior" when sewing tends to save time, and is well worth the added cost when sewing. Moreover, if you put that much love and time into a garment, you want it to last, and to be comfortable!
Some natural fabrics need to be handled more carefully in washing. See fabric care for more information.
Synthetic fabrics are man-made and include polyester, acrylic, nylon, and elastane/spandex (Lycra is a specific brand of spandex fiber). Synthetics are handy for certain things, but I rarely use them. I do buy stretch woven fabrics, like cotton sateen, that has a little spandex woven in. In this case the spandex comprises around 1-3% of the total fiber content, so it adds a nice stretch and stability. Synthetics have special properties, such as they tend to melt rather than burn. This makes them handy when making fabric flowers to seal a cut edge of fabric. They also need less pressing and ironing.
However, synthetics do not breathe well. They tend to stick to the body, and even the lightest weight synthetics can feel hot in the summer. Acrylics in particular tend to hold body odors, as do other synthetics - ever wonder why your deodorant suddenly doesn't work when you wear that cheap sweater? Now you know. I had a beautiful silk sweater that I wore until it wore itself out. I had to remind myself to wash it because it would never smell, no matter how much I wore it! Synthetics, on the other hand, tend to start getting perspiration smells within five minutes, even if you just showered.
The fact that synthetics absorb little moisture, while making them easy to iron, also makes them very susceptible to static cling - your favorite! It also means they tend to pill. Ever bought an inexpensive knit top and found that after less than six months of washing it had little pills all over it? Yep.
Polyester and acrylic are both made from the same substances as plastic - which is why some polyester is now being made from recycled plastic bottles, for example.
Some synthetics are useful for specific purposes - fleece, for example, is a good use of synthetic fibers, because it's warm and inexpensive.